*Beware: another one of those ‘I found this vintage Les Paul in my dad’s closet’ stories follows. I like to think that if my dad had one of these in his closet I’d have found it by now.

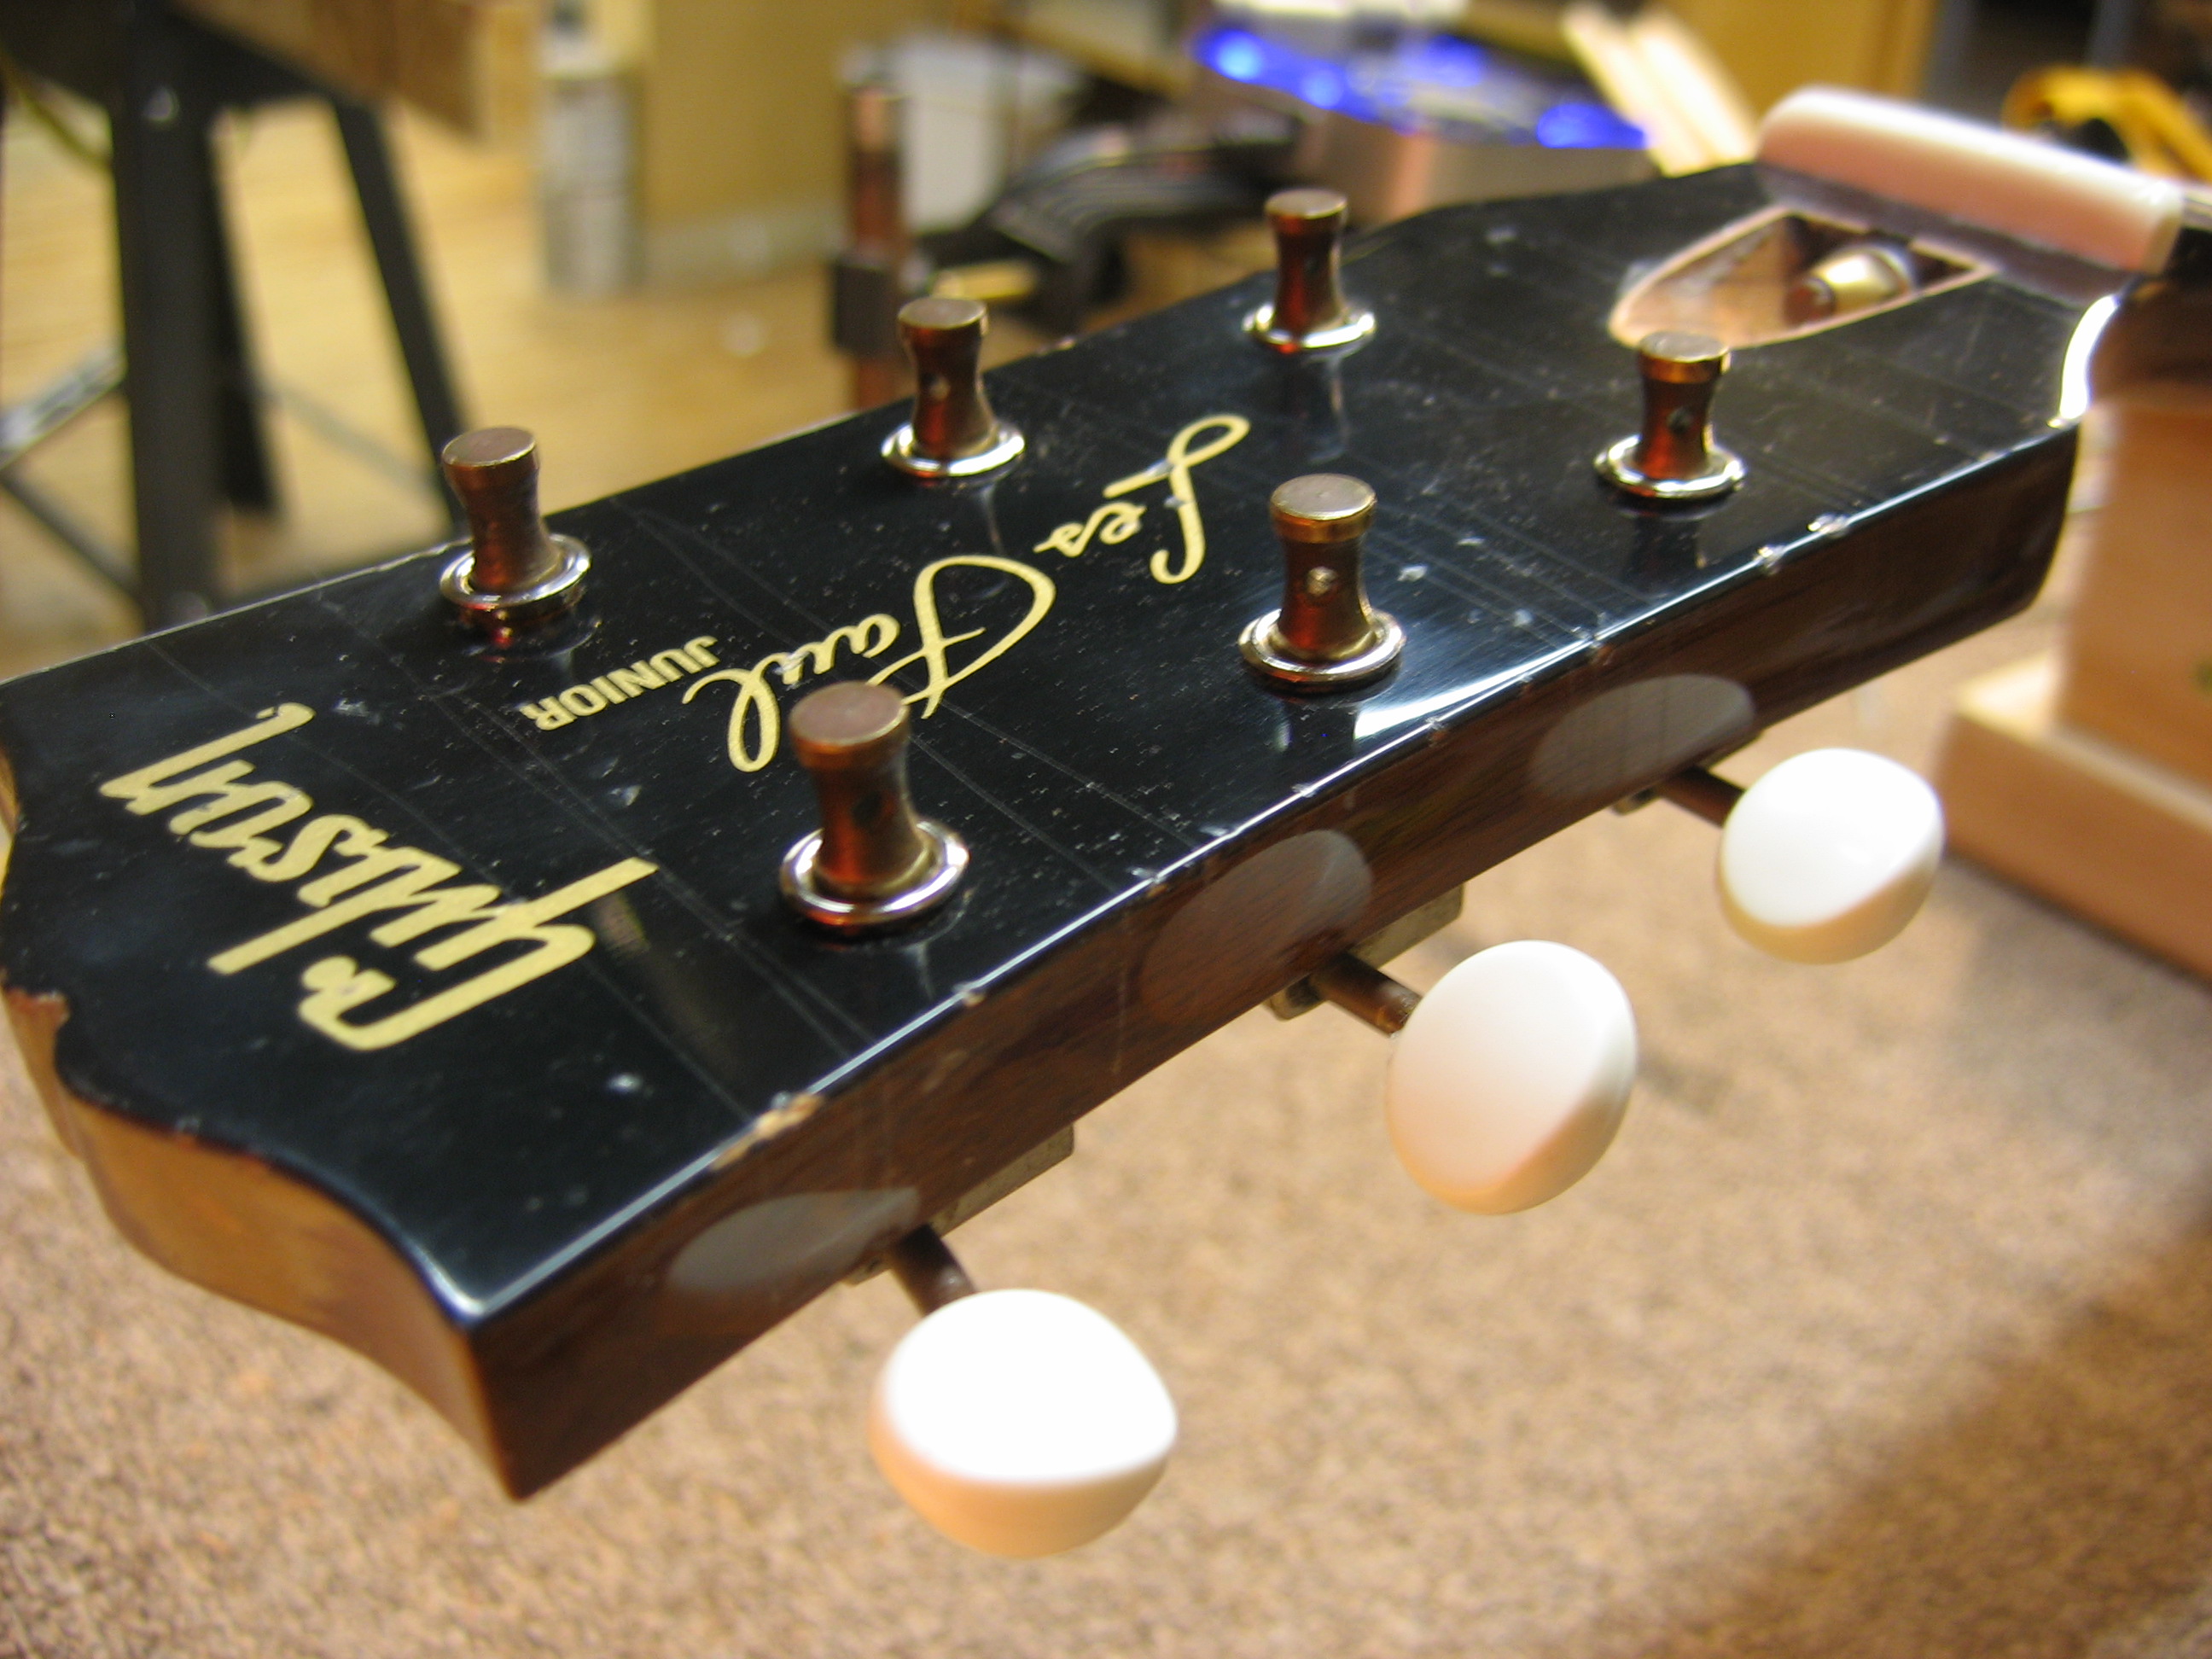
This 1956 Les Paul Junior belongs to a friend who, yes, found this guitar in her dad’s closet. But she couldn’t play it because there’s a pretty obvious piece missing: the entire headstock! This isn’t your average reglue job. This will require building a new headstock, replacing the truss rod, and making it look as if nothing ever happened. Read on to see how.

Our friend Laura told us this guitar had been in that closet in this condition for more than 20 years before she brought it to us. She recalled that the headstock had broken off years ago and had been repaired, only to break off again. You can see why; the repairman sawed off the end of the neck, cutting straight through the truss rod and creating a very small and unstable gluing surface that was never going to hold under the tension of guitar strings. One flying leap off the drum riser and it probably popped right off!
Look closely at the angle of that cut. If you can imagine, the string tension was pulling the headstock in a direction that would encourage that glue joint to open up. We’ll be cutting a new angle that points the other direction. This will have the strings pulling the joint closed rather than open. Before we can do anything else, we’ll have to remove the fretboard. We start by removing the inlay dots and heating the fretboard.


Once the fretboard is off, we removed the remnants of the old truss rod. This took some serious negotiating with rusted metal that had fused itself into the wood over 52 years.


At this point, we need to create a scarf joint (aimed in the right direction this time) and graft on a piece of mahogony from which to carve the new headstock.


Next, a new truss rod is installed that matches the look and function of the original one.

Now it’s time for this angel to get it’s headstock “wings.” Gibson headstocks have 3 pieces of mahogony that are joined together, then shaped by hand to form the profile that’s become so familiar to us.


In the background you can see a 1959 TV yellow Les Paul Jr. we used as a template to match all of the dimensions of a 50’s Gibson headstock. Once the neck shape is correct, we apply stain to match the color of the new wood to that of the old.

Next comes the Gibson logo using a waterslide decal. Just like the original.

We apply a top coat of traditional nitrocellulose lacquer and distress its appearance to match the original finish on the rest of the guitar. While we were working on this job, the owner found the original tuning machines but with their white plastic buttons dry and crumbling. We replaced the buttons, allowing us to keep and use the vintage tuners.


Vintage Gibson fans will notice that the serial number we stamped does not begin with a “6” as a 1956 model would have. The truth is, we aren’t trying to fool anyone with this repair. Anyone who knows what to look for will recognize that the headstock is not part of the original guitar. To make up a correct-looking serial number might bring it a little closer to what an original would look like, but it wouldn’t change the fact that the headstock is a replacement. So we decided that since the number could be anything at all, it may as well be Laura’s father’s birthday. It’s just a little tribute to the man who first bought this guitar when he was 20 years old in 1956.


What a great guitar!
Hello, This is such impressive work, my hat’s off to you! I am a 54 year old tradesman (auto dealer tech) who had taken a lot of woodshop classes in Highschool. I have also been playing guitars since 1964. I am seriously thinking about getting into guitar repair and building. I love guitars and I wish to do the work that I love. It seems there are only a couple of schools for this in the Chicago area, and they are so very expensive! May I ask you for some advise on getting into this field? I would be ever so grateful! Thank you!
Michael
Both Dan and I started at guitar building schools, then learned most of what we know on the job. The cost of school was worth it to us because it was going to be a career and we were willing to put the next several years into learning. If I were advising someone who was interested in guitar building or repair as a hobby or secondary work, I would say get your hands on some inexpensive but not horribly broken guitars and start trying to make them better. Dan Erlewine’s Guitar Player Repair Guide is a very good text to guide you. That text, along with lots of other books and videos, is available at stewmac.com . Like anything, ultimately, it’s a matter of practice, practice, practice.
Great work! Where did you acquire the Gibson waterslide decal? Thanks.
The decal came from an online supplier of replica logos.
Little by little, from a piece of wood to another, I keep on practicing my (still really low) skills in refinishing, repairing and setting up guitars. Right now, I am restoring my beat up ’81 Tokai Love Rock to ’59 LP specs. :)
To see the level and quality of work done on that ’56 LP is totally humbling, to say the least. I bow before the Master!!!
You’re right, Dan Erlwine’s Guitar Player Repair Guide is one of the most excellent book on the market for anyone who want to undertake his/her own repair/maintenance jobs …
Hi Guys,
How do you get those crack to the topcoat???
Thanx
Hi- I have spent hours on your site admiring the fine work you have put into these beutiful instuments- I am interested in a headstock built from scratch for a PRS guitar (a friend smashed his headstock off at a show a while ago- and gave me the guitar it is a beauty but will need to be rebuit from scratch- I have a body and neck can you give me any type of quote?
Well, that’s kind of the secret Andi. ;-) At the risk of giving away the Colonel’s secret recipe, I’ll tell you that some of the checking is drawn in by hand and some of it is achieved with dramatic temperature changes.
Ken, I think I just responded to another email you may have written (unless it was a different Ken with a different PRS without a headstock.) Let me know if that wasn’t you and I’ll send you the same information.
Amazing work. Gibson headstock breaks frighten me! One question – did tyou plug the truss rod channel (near the nut) so that you could use a 2 hole Gibson truss rod cover?
Umang,
Beneath the fretboard, there is an insert that actually stretches the full length of the truss rod channel. You can see Dan beginning to remove it in the 6th picture. It fills the channel and provides a surface for the truss rod to push against. That insert extends past the nut and provides the surface you’re talking about for a cover screw.
Nice work. The Gibson logo looks a bit too gold (should be more of a copper/brown color on these old Juniors, but otherwise, WOW! Fantastic.
I own a 57 gybson jr. but someone changed the keys made the holes bigger do you know were I could find replacement key that resemble the originals but fill a bigger hole hope you can help Rick
hey i love your work i was just wondering if i can get you guys to build me a gibson look alike neck im trying to build my own les paul junior and i cant get the neck to how i want it it comes out a little slppy and im to nervous and afraid to make and add on the fretboard so yea if you guys have an intructional video on making a LP Jr. neck or if you guys could make and sell me a neck that would be great
I have a 1967 Gibson Melody Maker that was damaged almost like the Les Paul in your repair demonstration. It needs the head stock either replaced or put back on some how. I made a big mistake sending it to Ed Romans in Las Vegas. I had sent pictures of the break and was assured they could repair it for around $300.00 with return freight included. After spending $60.00 dollars to ship it out there I talked to them and they said they made a mistake and it would cost about 4 times that. To say the least I was crushed. Being a 80% disabled Vietnam Vet on a very limited income I bit the bullet and spent another $60.00 to have them ship it back. The owner ED was very rude to me over the phone and acted real put out I would not let them repair it. He kept trying to sell me another guitar. Now after this long story my question is how much do you think it would cost to repair it. Just a ball park figure would be OK,great. The guitar was given to be by another Vietnam Vet that is no longer with us. It means a lot to me to keep it if you know what I mean. Any help or correspondence would be much appreciated.
Thank you,
Bill
Your repair was remarkable considering what they brought you! This was a great read, and the work documented was great.
Baseball Bill,
We can usually give an accurate pricing by email if we see high quality photos from different angles. While a simple headstock reglue and touch-up does cost around $250-300, a repair like this is much much more time-consuming and difficult and is quite a bit more expensive. The cost was justified in this case because of the guitar’s value as a vintage instrument and because of it’s personal value to the owner. We’ve had that conversation with many many guitar owners and some have decided to go ahead with the work and others haven’t. If you’d like to email us some photos we’d be more than happy to give you our thoughts and a cost estimate for the work. info@chicagofretworks.com
Hi Steve or Dan?,as i read above yeah I have to chime in too; thats a KILLER job,and your a younger guy too lol! I’m a Earlwine “apprentice” but after stumbling accross your site have to say your really something! being a clean break helps but man you did wonders with this.
What kind of heating device are you using to separate the fret board? is that a custom made deal? and what school did you attend? I’m a player but after being in the racket for 37yrs I just started to doing my own work.Thank God for Stew mac huh?
I had an severe arm injury so this is where I seem to be heading.
I’m getting good at fret dresses, setups, and did a few body breaks(that were clean)and other “easy stuff”; and have built several nice solid bodies,with bolt on that turned out great.but finishing like what you’re doing?hah ha! man thats a whole new ballgame! Thanks for your time and if I ever need some serious work I can’t do on my Pauls I will give you a buzz Thanks again..Sincerely Johnny W of Ohio
Johnny,
Thanks for the compliments. We use the same heating “blanket” sold at Luthiers’ Mercantile under tools > heating/bending. We have an assortment of different sizes for different jobs. For schools, Dan attended Red Wing, MN Technical College and I went to Bryan Galloup’s Guitar Hospital. We recommend both schools to anyone looking to get into this field.
hello, just perfect,very good job! i’m trying to repair my LP studio, can you please tell me where did you get the decals?
i’d like to buy for mine, thanks!!!
Nice repair! I am restoring a Ludwig Wendell Hall Professional Banjo Uke made in 1927 in Chicago. I badly need a replica peghead decal, and would be gratefull if you could share with me your online supplier. Matt
where can i get those headstock decals?
I’ll email you the contact info Pat.
thanks for posting the rebuild you saved a classic instrument bravo a job very well done!
Can you tell me what the neck dimensions are on that guitar (thickness at 1st and 12th frets) Trying to compare it to my 2010 LP Jr., which I believe is a “C” and somewhere between the classic 50s and slimmer 60s… THANKS!
I wish I could answer that question better Frank. Unfortunately, that guitar was here about 2 years ago and we never took those measurements down. But as I recall it was not as bulky a neck as you found on earlier Les Pauls.
Awesome job, guys. There’s not too many people that can handle a job like this and pull it off to the level that you guys did. How do cut the “dimple” in the top of the headstock? Is that a special tool? I noticed you started by rounding it off, and I’ve always wondered how they cut that part.
Not be coy, but the entire answer to your question is this – veerrry carefully. At this point in a repair of this size you just can’t afford to make a mistake. If we had to start over… I don’t even want to think about it. We did all the work on this piece by hand. For that particular cut, we drew it out using the other Junior as a template, and cut it by hand with a coping saw, files, and sandpaper. Measure twenty times, cut once.
where do i get the gibson decals, i wan´t them for my Les Paul, thanks, please email me.
Based on what I’ve seen of these folks work, I decided to get a bad headstock repair on my ’52 goldtop REALLY repaired using this method….should up here before too long. Based on the in-process pics pics I’ve seen I can’t wait to see the results!
Hello, I restored a Gibson Explorer 84 (1984) Hetfield – Metallica, where I can buy headstock logo?
Thanks
Mike, I’ll email you a link to our logo guy. He does great work.
Hey could you email a link to the logo guy – cheers i’m restoring a les paul and rickenbaker
hi i have repeared an headstock crack of a P.R.S . SE custom
and now i want to refinish the headstock and the back of the
neck i dont know if the decal wil survive the refinish
if i know where to get these decals i feel a lot saver
greathings from egbert mulder
Hi, I was most impressed with your work re-building the headstock. I’d like to know if you needed to build a jig to make such an exact scarf joint cut while the neck was still on the guitar. If not, how did you do it?
Bill
Bill, we actually didn’t jig that part of the operation. It’s just a cut by hand. It’s hard to explain, but basically once that cut is made, both sides get sanded precisely to fit perfectly. Then the new piece of wood gets shaped to fit the angle and shape of that cut and that’s where the real hard part is. A steady hand is the most important tool we have.
Cheers!
Steve, I’m re-building a broken headstock from a Gibson J-45 (a gift for my daughter). I have the scarf joint cut and the new blank built. How did you cut that truss rod nut well into the headstock? I’ve ruined two blanks already once with a drill press and a Forstener bit and another with a router. Whats the secret?
Bill,
Hopefully the response I emailed you directly will help. Good luck – this is definitely a major league repair. Let us know how it turns out.
WOW – such a beautiful guitar and awesome job!!!
Steve, I am having a hard time pressing new buttons on my vintage Deluxe posts. Luckily have plenty but it almost seems you need to pre heat the buttons?? Im really getting the posts hot but they just don’t go on as i would expect when the plastic hits the post. Any advice?
Shawn,
I think you’re asking about replacement buttons for vintage tuners, correct? We frequently have to carefully ream, drill, or otherwise hand-fit the buttons a little. Try to get them to fit without glue first and then follow this process: http://www.stewmac.com/How-To/Online_Resources/Hardware_Installation/Replacing_damaged_tuner_knobs.html . Be very careful of super-glue near a vintage finish as you don’t want to drip any on the old lacquer.
Shawn, I find the best way to install these is to remove the tuners from the neck and clamp in a vise. Then heat the shaft with a propane torch. The buttons that seemed like they would never fit slid on smoothly once the shaft was hot enough. When cool they were really secure even without any glue.
Before installation determine how far on they should go and make a c shaped spacer to suit so they all get pushed on to the same depth and stay even.
Richard
Bill, I cut the truss rod recess for Gibson style guitars with a extra long 5/8ths carbide Forstener bit I bought from Rockler Woodworking and Hardware. The extra length allows you to drill deep enough without the chuck of your drill press hitting the headstock face. The neck or graft must be clamped rigidly to the drill press so as to allow no movement. Also score the wood at the stopping point on the left side to prevent the emerging half of the bit from blowing out chips helps you achieve clean results.
Stewart mac also sells a counterbore tool for this purpose that looks like it would work although the counterbore appears to be too large for an authentic look.
Richard Weikum